Dazbo's GCP Skillsboost Challenge Lab Walkthroughs
My experience and walkthroughs with the GCP Skillsboost Challange Labs.
Create and Manage Cloud Resources: Challenge Lab
See Challenge Lab
Objective
This lab is in three parts:
- Create a jump host instance
- Create a Kubernetes cluster and run a simple service
- Create an HTTP(s) load balancer in front of two web servers
The first challenge is so trivial, it’s not worth mentioning.
I’ll documention my solutions to other two parts here.
Create a Kubernetes Cluster and Run a Simple Service
Objectives
We’re asked to:
- Create a cluster (in the us-east1-b zone) to host the service.
- Use the Docker container
hello-app(gcr.io/google-samples/hello-app:2.0) as a placeholder; the team will replace the container with their own work later. - Expose the app on port App port number nnnn.
My Solution
First, let’s define some variables we can use throughout this challenge:
port=8082
instance_type=n1-standard-1
region=us-east1
zone=us-east1-b
network=nucleus-vpc
First, we create a three node cluster, using the required machine type for our nodes. Note that this takes a couple of minutes to run.
gcloud container clusters create nucleus-cluster \
  --machine-type=$instance-type  \
  --num-nodes 3 --zone $zone
Then we need to fetch the credentials for our new GKE cluster, and update our local kubeconfig. This allows us to run kubectl commands against our new cluster.
gcloud container clusters get-credentials nucleus-cluster --zone $zone
Let’s verify our cluster:
kubectl cluster-info
Now we need to deploy an application, using a container image pulled from the Google Container Repo (GCR).
Although we’re not told to specify a number of replicas, I’ve elected to deploy three replicas of the application:
kubectl create deployment hello-server \
  --image=gcr.io/google-samples/hello-app:2.0 --replicas=3
Now the instructions get a bit funky. We’re told to expose the application using a load balancer, on a specified port, e.g. 8082. (The actual port number can vary from lab instance to lab instance.)
This command exposes our application replicas using a Load Balancer with a frontend IP address. Note that I’ve named the exposed service hello-svc.
kubectl expose deployment hello-server --name=hello-svc --port=$port --type=LoadBalancer

# And check the service
kubectl get service
Note that whilst the block above is what the lab requires, it results in a service that doesn’t actually connect to the application. If you want the frontend LB to actually successfully connect to the application exposed in each container, use this line instead:
kubectl expose deployment hello-server --name=hello-svc --port=8082 --target-port=8080 --type=LoadBalancer
The above command results in a working application, which we can test by pointing our browser to:
http://[LB-external-ip]:8082
Alas, the lab won’t properly update progress if you do the above command.
Create an HTTP(s) Load Balancer in Front of Two Web Servers
Objectives
We’re asked to create a fault-tolerant environment of two nginx webservers, accessible via an HTTP load balancer.
We’re given explicit requirements:
- Create an instance template.
- Create a target pool.
- Create a managed instance group.
- Create a firewall rule named as
some-nameto allow traffic (80/tcp). - Create a health check.
- Create a backend service, and attach the managed instance group with named port (http:80).
- Create a URL map, and target the HTTP proxy to route requests to your URL map.
- Create a forwarding rule.
Anatomy of a Load Balancer
We’re going to build something like this:
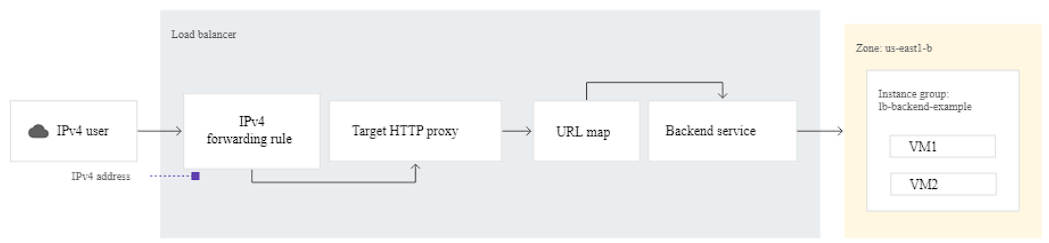
My Solution
We’ll continue to use the environment variables defined in the previous part. Additionally, we need a specific firewall name, which is supplied in the lab. (Yours will probably be different.)
fw_rule=grant-tcp-rule-667
Don’t forget to change the above line so that the rule matches what was supplied in your lab.
First, let’s create a startup.sh using the supplied start-up instructions:
# Create startup script
cat << EOF > startup.sh
#! /bin/bash
apt-get update
apt-get install -y nginx
service nginx start
sed -i -- 's/nginx/Google Cloud Platform -- '"\$HOSTNAME"'/' /var/www/html/index.nginx-debian.html
EOF
This startup script installs nginx on a the Linux machine, and then starts the nginx service.
Now we create an instance template:
gcloud compute instance-templates create nucleus-nginx-template \
  --tags=allow-health-check,web \
  --network=$network \
  --machine-type=$instance_type --image-family=debian-11 \
  --region=$region \
  --metadata-from-file=startup-script=startup.sh
Here I’ve:
- Added two network tags, called
allow-health-checkandweb. Strictly, the lab doesn’t require these. But I find it good practice, and allows us to wire up two separate granular firewall rules, if we want to. - Defined a metadata item called
startup-script, pointing to our localstartup.shfile. Thus, each new instance we create from this template will us the startup.sh we created earlier.
Now create a target pool, as explicitly requested by the lab:
gcloud compute target-pools create nginx-pool --region=$region
It’s worth noting that a target pool is a legacy approach, and we wouldn’t normally use a target pool with an HTTP(S) load balancer. But this lab requires it. Also note that when we use a target pool, we’ll also have to use a legacy HTTP healthy check.
Now, as required, we create a managed instance group from our template, with two instances:
gcloud compute instance-groups managed create nginx-group \
  --base-instance-name=nucleus-nginx \
  --template=nucleus-nginx-template \
  --size=2 \
  --region=$region \
  --target-pool nginx-pool
Here I’ve defined a base name of nucleus-nginx. The lab mentions that our resources should be named team-resource. Thus, all instances in my MIG will be prefixed with nucleus-nginx, followed by a random string.
Here’s the gotcha.
The lab says we need “to create a backend service, and attach the managed instance group with named port (http:80).”
It turns out that if you don’t add a named port to the managed instance group, then you can’t successfully complete the lab. This took me quite some time to work out.
So let’s add the named port:
gcloud compute instance-groups managed set-named-ports nginx-group \
  --named-ports http:80 --region=$region
Now we create the firewall rule, with the lab-supplied name:
gcloud compute firewall-rules create $fw_rule \
  --network=$network \
  --action=allow \
  --direction=ingress \
  --source-ranges=0.0.0.0/0 \
  --target-tags=web \
  --rules=tcp:80
Note that although the lab doesn’t ask us to, I’ve set this firewall rule so that it only applies to instances with the web tag. And, of course, our instances do have the web tag.
Now we’ll create the health check:
gcloud compute health-checks create http http-basic-check --port 80
Now create a global backend service for HTTP uses our health check:
gcloud compute backend-services create nginx-backend-service \
  --protocol=HTTP --port-name=http \
  --health-checks=http-basic-check \
  --global
Now we add our MIG to the backend service:
gcloud compute backend-services add-backend nginx-backend-service \
  --instance-group=nginx-group \
  --instance-group-region=$region  \
  --global
Create the URL map, such that any HTTP requestes are forwarded to our backend:
gcloud compute url-maps create web-map-http --default-service nginx-backend-service
Now we create a target HTTP proxy to route requests to the URL map
gcloud compute target-http-proxies create http-lb-proxy --url-map web-map-http
Finally, create global forwarding rule to route incoming requests to the proxy:
gcloud compute forwarding-rules create http-forwarding-rule \
    --global \
    --ports 80 \
    --target-http-proxy http-lb-proxy
And that’s it!